Blacksmith Tools
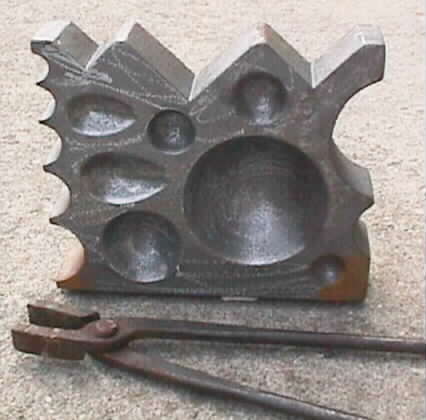
SWAGE BLOCK
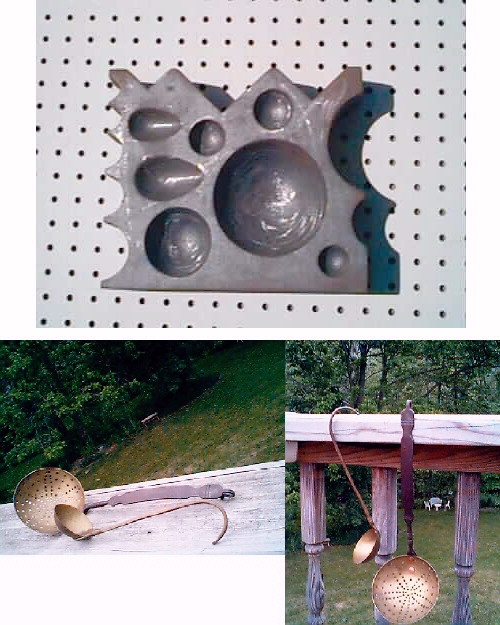
The block and two pictures of a ladle and a strainer that I made with the block.
Swedge Block
Cast Iron swedge block approximatly 40 pounds
$200.00 + $35.00 shipping via USPS Priority Mail flat rate in the USA only.
Payment via PayPal only to ted@blackstonemill.com
The block measures 10″ X 8.5″ X 2.25″
2 sizes of spoon molds Tea and Table
5 sizes of bowl molds 1.125″ , 1.375″ , 1.625″ , 2.5″ , 4.375″
7 half rounds .75″ , 1″ , 1.25″ , 1.375″ , 1.625″ , 2″ , 3.75″
3 V’s
It is high quality cast iron. They are left to anneal in the sand casting until cool. They are cast in an Amish foundry from a pattern that I made in 1985.
This block is small and light enough to carry around, pack away, and use easily. But it is large and heavy enough so when you are hitting it, it does not move around. It is massive enough to form the metal into without bouncing.
To start simple and cheap all you need is a block, a hammer (small ball peen will do), heat source (a cheap propane torch will do), a bowl for water, and tin snips. Use a copper or brass disk about 30 mil thick and cut a circle the diameter of the large bowl depression in the block. Later you can use a larger disk than the depression but that’s a little harder.
You must anneal the disk. To anneal brass, copper, silver and other nonferrous metals, it seems strange but just heat it with the torch (to a dull red in a dark room) over a bowl of water and drop it in. It will turn black but don’t worry you’ll polish it at the end. It takes all workhardness away and makes it soft and malleable until you hit it a few times and work harden it again.
The metal moves easily when it’s soft, but try to end with the bowl work hardened. It will be stronger when it’s used. Now put it in the depression and hit it with the hammer. Spin it around with one hand while hitting it with the hammer. Keep hammering on one spot of the depression and move the disk under the hammer. Work around the outside of the disk first, then work towards the middle.
The hardest part is keeping the metal from folding over on itself and making a crease in it. This is where practice comes in. When you see it start to buckle work it out right away then continue forming. Another part of practice is learning when to anneal again. You’ll get a feel for it when the metal starts to work harden. I might anneal it 6 or 8 times before I’m done.
All in all it’s really not hard to do and you should get a reasonable bowl the first or second time. If it cracks, you didn’t anneal it soon enough. Throw it away and start over. After the bowl is formed, I smooth the edges out with a file or on a belt sander and polish it. I use a buffing wheel but you can use elbow grease and Brasso.
The simplest handle is just round stock that you flatten one end slightly and form in the same depression as you made the bowl in. Now rivet them together. If you can’t find rivets you can use solid copper wire 10 or 12 gage, or the brass wire that is used in toilet tank ball lifters. You can countersink the hole on the back side of the handle, peen the rivet into it, then file the excess flush with the handle. Bend a nice curve on the other end of the handle, polish and you are done.
(Here are some more hints)—. With brass or copper anneal it often and use a wooden hammer. I made one from a tight grained trunk of a small hickory tree. I made a blunt point on one end and I drilled out a 3/4″ hole on the other. Then I filled the hole with lead shot and sealed it with a plug. A dead blow wood hammer! Using a wooden hammer gives a smooth bowl. If you use a steel ball hammer the bowl will appear hammered, but that’s not a bad look either.
When making a strainer I make the bowl first, then lay out the hole pattern with a compass, usually in a hexagonal design. Then I use a center punch and mark each hole. Next I stand at the drillpress and drill every hole. And then with a chamfering bit I touch each hole on both sides to have a slight taper to them and remove the burrs. Most of the drillpress work I do just holding the bowl in my hands and pushing it into the bit.
When attaching the handle I shape the part that goes onto the bowl in the same swedge depression that I made the bowl in, only I do it hot. I do this after I flatten it a bit on the anvil and shape it with files. I usually use copper rivets with the head on the bowl side and I cut a deep chamfer on the back side of the handle. I peen the rivet into the chamfer then I file it smooth with the handle. I use two rivets. I polish the whole piece on a buffing wheel.
Here’s a few tricks on a steel handle. I start with round stock, put in a lathe and turn little ogees and beads on it. (If you don’t have a lathe put the round stock in a vise and with a triangle file cut grooves around it while turning it in the vise. Then with a half round file form the beads and ogees the same way.) Use these files with the lathe to finish the design. It’s real fast. Next, I flatten above this design to form the handle and below the design to form the part that is attached to the bowl. This is done hot. Next, I’ll shape these parts with a large half round or flat file. I’ll “draw” file (holding the flat of the file at right angle to the work in the vise and pulling it towards me with both hands) the front of the handle to make it smooth leaving the back side hammered to prove it was forged. At this point I’ll sign the work with letter punches. One more trick, with a sharp punch of a design, like a heart or a star, punch the freshly draw filed steel handle. Then with a gas torch and a brazing rod I braze over the punched design. Then carefully draw file the excess brass away leaving the star or heart imbedded in the steel. It looks like you inlaid the design into the steel.
The blocks are actually cast in an Amish foundry with no electricity used. He has a cupola about 15′ high that he’s layered iron and coke into and a diesel engine blowing air in the bottom. He starts the fire the day before. when he is ready to pour he takes an air drill with a 4′ bit in it and drills a hole in the bottom. The iron flows very liquid and white hot into a crucible. Then two men with tongs carry the crucible into the next room and pour the iron into the sand molds. This process repeats all day until all the sand molds are full. He adds more iron and coke as he goes and pours several tons of iron a day. It’s something to watch with a lot of sparks flying. I’ve helped him pour and been on the tongs. Though most of the time is spent making the sand molds during the week. At the end of the pour several men with long rods bust out bottom of the cupola spilling what’s left of the charge (molten iron, slag, white and red hot chucks of iron, and burning coke) on to the floor and pour water on it. Then in a flood of white and red hot metal, sparks and a tremendous amount of steam the pour is over. Time to go home they’ll bust the castings out of the sand tomorrow and do the finishing touches on them.
I have sold over 50 of them over the years and used one myself and never had any problems with cracking or breaking. I will personally guarantee your satisfaction. If you don’t like it, send it back. I will give you your money back. I am approved to accept Visa and MasterCard by my bank, If you would like to buy it that way I can ship the next day and you’ll have a 30 day satisfaction guarantee by your card. If I ship to a PA address a 6% sales tax is necessary.
The following are some comments I got back from my customers:
“Thanks Ted, I’ve been pluggin’ your swage block to all the smiths I know. Hope to get you plenty on business. Good luck and love the block. Bud”
“Hi Ted, The block came today and it looks better than what I had expected. Thanks much for your help and very quick response. I am going to go try to find where to post positive feedback. Thanks again—Ottis”
“Ted, I just want to let you know that I have my block and I am very very very please with its quality. I have even tried it out on some mild steel and it works great. Thank you for such a wonderful product. Eric”
“Hi Ted, We received the swedge block friday. It arrived in great shape. We went away for the weekend, so I haven’t had a chance to try it out yet. I’m looking forward to using it (and making Michelle lots of household niceties). Thanks again for the great deal you gave us. It has been a pleasure doing business with you. Joel”
“Ted, Thanks, the block is great! Will get many hours of use here. Placed a positive feedback on your eBay listing just now. Best of fortune to you David “
“Ted, Received block today – in fine shape. Really pleased, and plan to use it this weekend at a living history here in N.C. Again, thanks! Ray “
” TED, I returned from my trip to Texas and received the block this morning. I love it. I’m looking forward to working with the block and you in the future…Thanks again Jim
Blackstone Mill
Box 98 Mill St.
Pillow PA 17080-0098